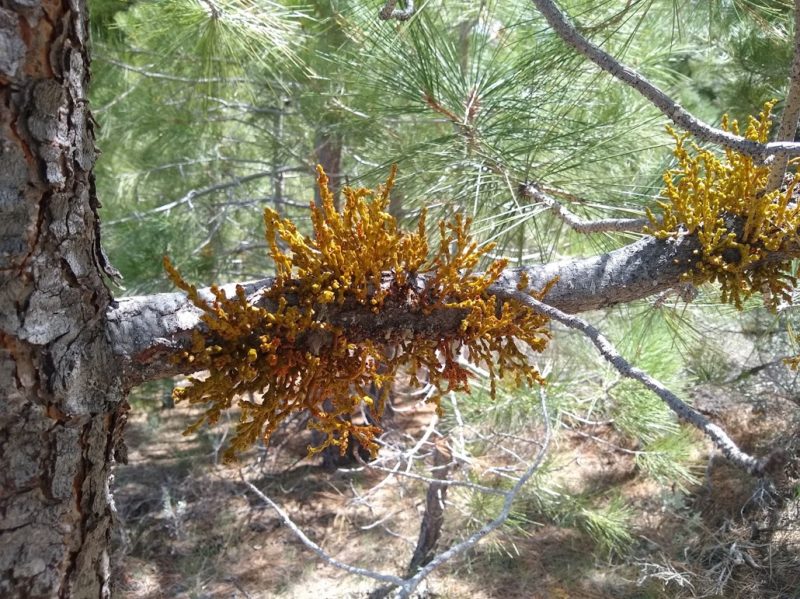
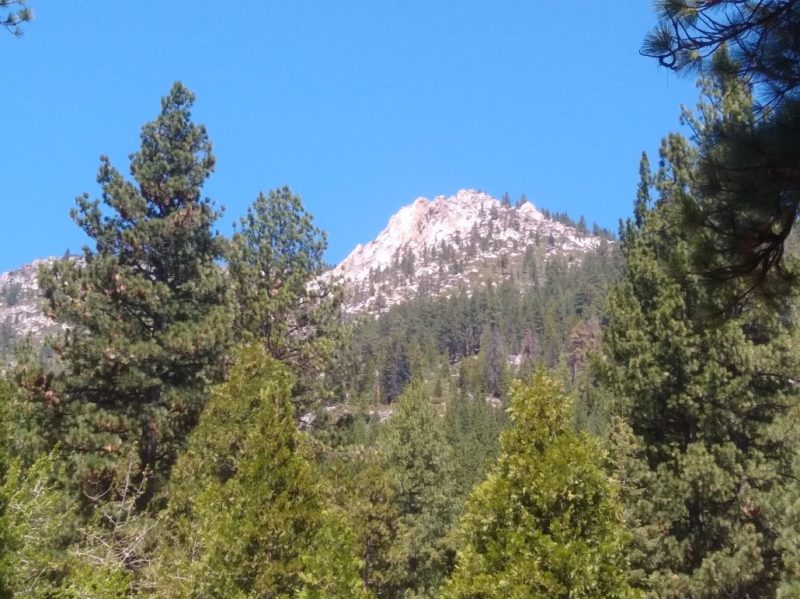
Grover Hot Springs State Park is a pretty cool place to visit, located along the eastern side of the Sierra Nevada mountain range and offers many things for the Avid outdoor enthusiast. You can find a nice campground here with spots for smaller RVs and lots of tent sites, along with a Hot Springs pool where you can go relax. Also they have tons of miles of trails in the park and nearby.
Just outside the Grover Hot Springs State Park is a little town call Markleeville California, which is very small but quaint and has a couple of different restaurants, a general store and other nice little shops that are fun to visit and check out.
* Address: 3415 Hot Springs Rd,
Markleeville, CA 96120
* Elevation: 5,900 feet
* Established: 1959
* Size: 553 Acres
* Phone: (530) 694-2248
* Reservations: (530) 694-2248
* Pool: (530) 694-2249

Campsite Fee:
$35 a day
Hot Springs Fee:
$10 adults
$5 (17 & under)
Add. Vehicle Fee:
$8 per vehicle
Pets:
Allowed on leash &
attended at all times
Showers:
Hot showers
($1 for 5 min.)
Potable Water:
Yes, many spigots around campground
Toilets:
Yes, flush toilets
Dump Station:
No
WiFi:
Not Available
Cell Service:
In Some Areas
1-3 bars
Roads:
Paved Throughout
Campground
What's Sold:
Firewood: $8
Ice: $4 (5 lbs.)
Campground:
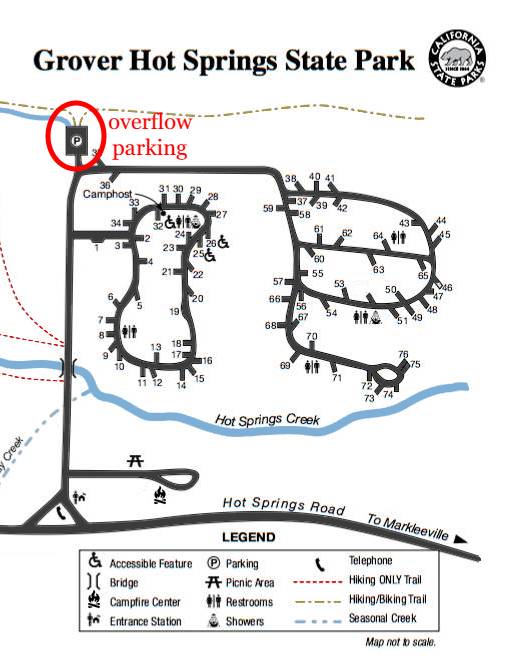
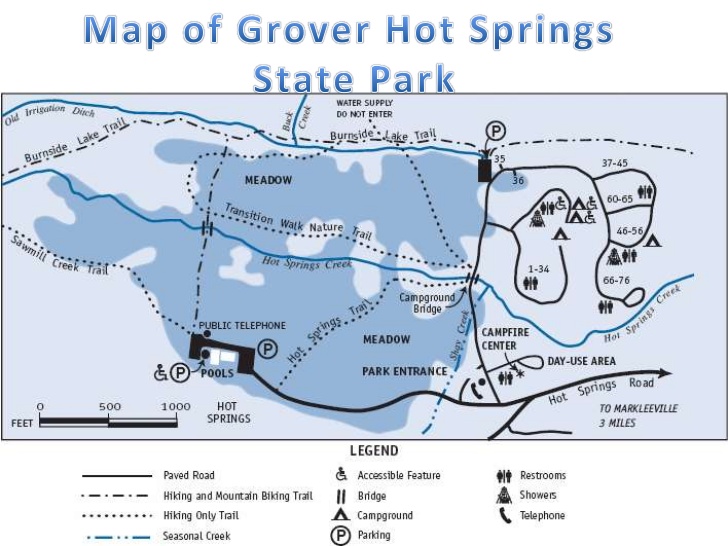
The campground itself has a total of 76 sites, which are mixed between RV sites and tent sites. It is geared more towards tent camping, but you can also bring a small camp trailer, as they have just enough room to fit more compact setups.
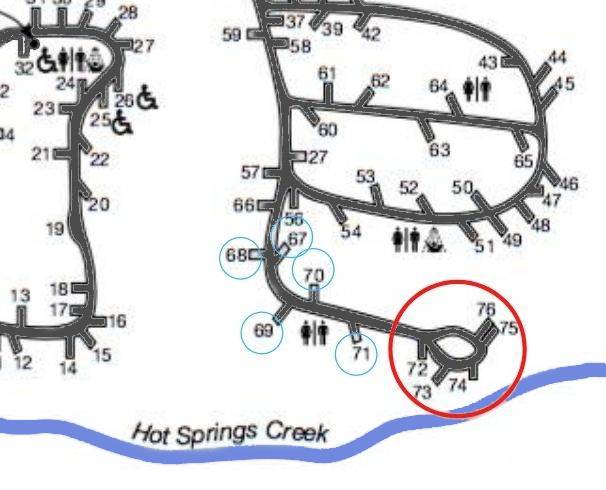
There are two different loops in this Campground and the first loop contains sites 1 through 36, while the second loop holds the remaining sites 37 through 76, which you can see on the map below.
Campground Map:

Campsites:
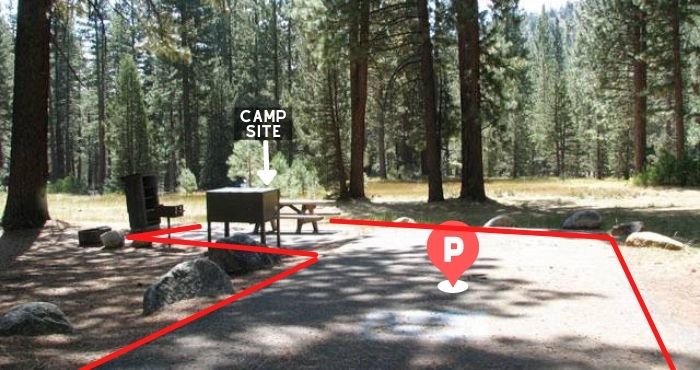
Most of the campsites at Grover Hot Springs State Park are pretty spacious, and you could fit several tents and pop-up shelters easily in most of the sites, due to the wide open area of each individual site. This is true for sites that are located on the outer perimeter of the road and is also true for some sites that are located within the inner circle areas as well.
On a side note though, not all sites are large enough to accommodate multiple tents and other shelters, so keep that in mind before booking your site and be sure you do your research to get a site that has plenty of room for all of your camp equipment.
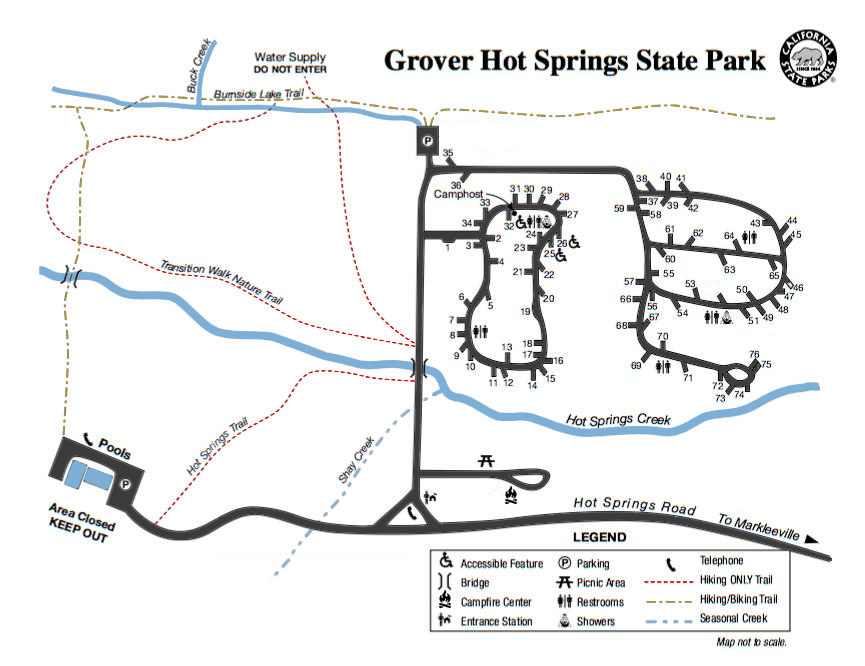
RV Sites:
The RV sites in the park were marked by these yellow markers on the campsite post, as indicated in the image, and have a smaller asphalt pad for you to park your trailer or RV on.
A good majority of the asphalt pads ran perpendicular to the actual campsite, making for a more "T" shaped camp layout.

One thing I did notice about the RV accessible sites was that the parking layout seem to be switched around from other campgrounds I have visited and could have been better thought out.
Most trailers and RV's have their door located on the passenger side of your vehicle and a lot of the pads seem to be set up for the doors being on the opposite side (driver's side), which usually required you walking out your camper, around your camper in order to access your campsite.
I really just wanted to point this out as it was not really a dealbreaker, just something I noticed when walking around.

Example RV Site (Site 70)
Tent Sites:
There were a ton of really cool tent sites in the campground varied in size from really huge to smaller and a couple of sites that were in between the two.
Sites that were dedicated to tent camping only had a dark brown placard with a small white tent icon in the middle of it.


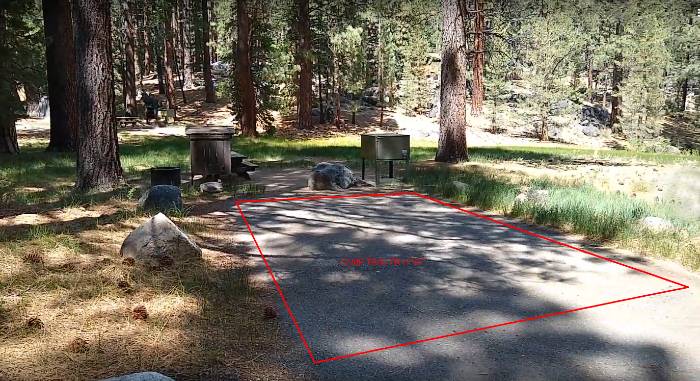
Example Tent Site (Site 66)
There were some instances where some of the campsites were closer to your parking area, like the image above shows with site number 66. These might be desirable for some people out there and I wanted to point out that there are some sites within the campground that are laid out like this.

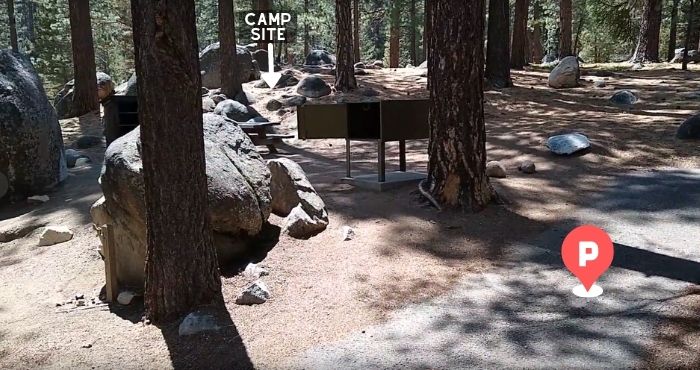
Example Tent Site (Site 54)
I also noticed that most of the tent sites had the campground area (where the fire pit, bear box and picnic table were located) a little ways away from where you would park your vehicle. The above image is a good example of the distance between where you park your vehicle and the actual campsites are located, which is seen here on site 54.
Handicap Sites:
There were only two specific sites that were dedicated to accommodate disabled people and these were sites 25 and 26.
The parking area was a little bit larger than the others, both lengthwise and width wise and the picnic table and fire pit were also paved, making for a seamless transition to your campsite from your parking spot.


Example Disabled Site (Site 26)
Unique Sites:
There were a lot of unique sites in the campground that had cool elements integrated either within the site itself or another natural aspect nearby that made it stand out from the other sites.
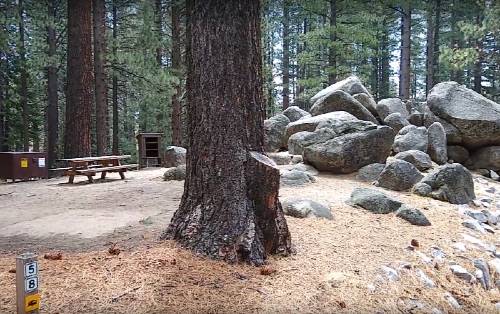
Large Boulders: Some sites had very large boulders integrated throughout the area that made for nice privacy barriers on one or more sides of your site and these were just really cool to look at and made the site itself look way more interesting and have a lot more character.
Here is a picture of site 58 that had some of the largest rocks around, and it provided a nice buffer on that side from a lot of other campsites.

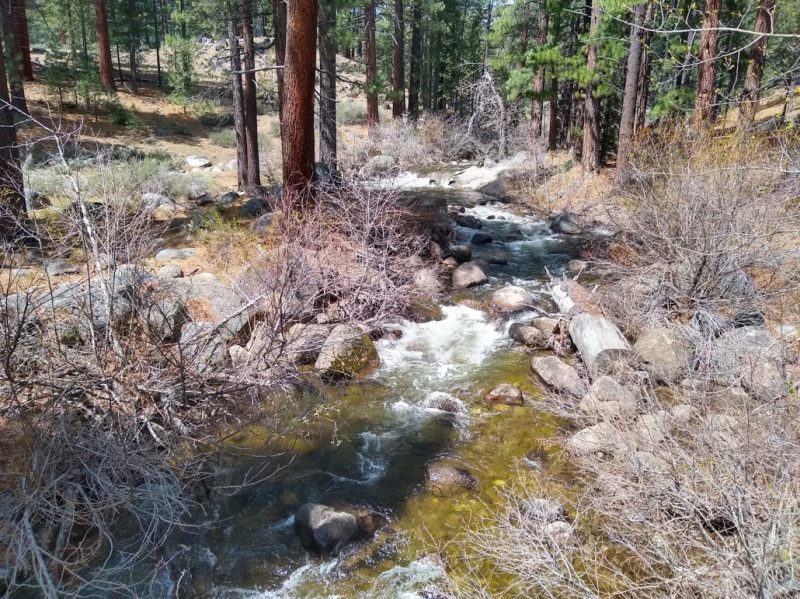
Creek Side Spots: There were four different sites that were located right by the creek and on our trip, the creek was running quite fast, and you could hear it very well from those four sites, but you can also hear it from nearby sites that were further up.
The four closest sites to the creek were sites 73, 74, 75 and 76, but you could hear the creek from sites 67 to 76, which were the ones that were located on the lower loop of the campground.

The soil in the campground is a coarse sand type of texture and is a little messy when going in and out of your tent or camper, so be prepared for that.
Having a broom on hand will help you keep things a lot cleaner.

Campsite Features:
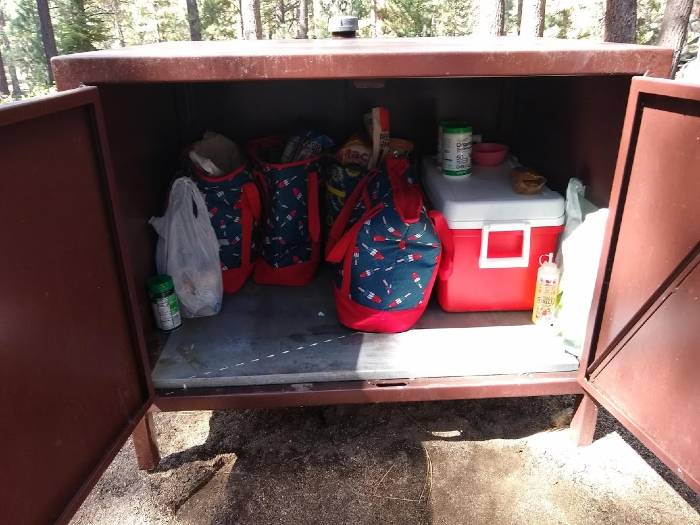
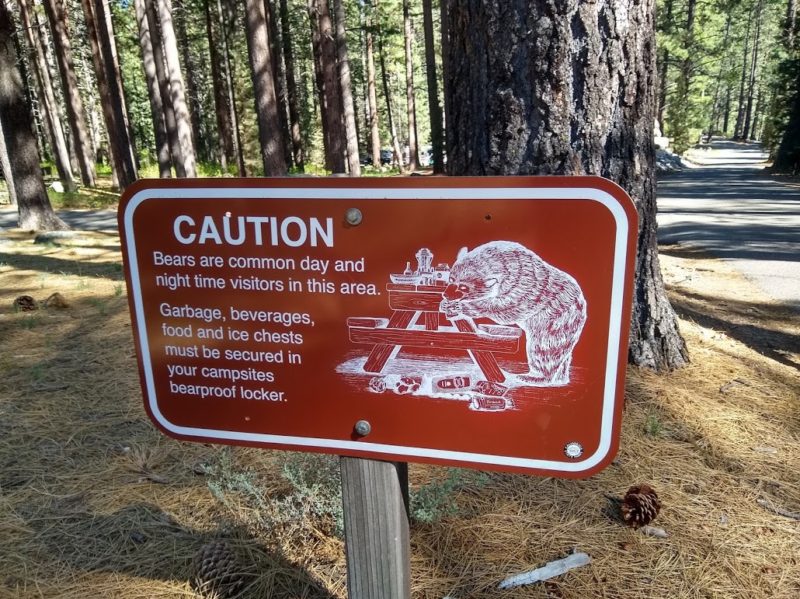
A lot of the features that you would find at other campsites were also available here at Grover Hot Springs State Park like a picnic table, a fire pit and a dry storage pantry area where you usually keep your food. Since there are a lot of bears around they actually provide an additional bear locker that is used to store all of your food in, day and night.
Picnic Table

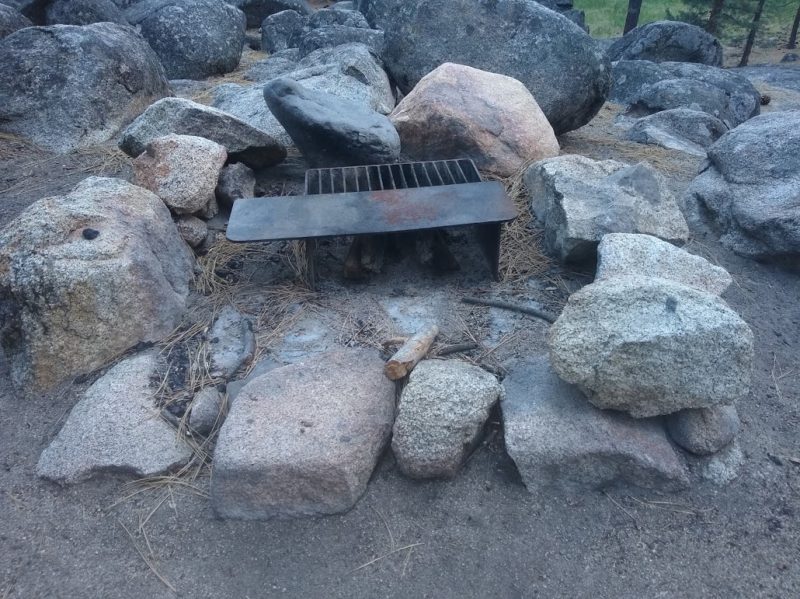
Fire Pit

I do want to note that not all sites had this fire ring, some sites actually used rocks as their fire pit, and it looked like they used an additional metal grate that was placed on top, so you can cook on it if you wanted to.
Bear Box

These are quite large and we were able to fit our two 70 quart ice chests inside it, along with five of our soft cooler bags and a few other dry food bags, and we still had plenty of room for more storage.
Dry Storage

Most people use these for storing their wood or other random items like lanterns, flashlights, etc. instead.
Hookups:
There were no RV hookups whatsoever in the park, so this is really a dry campground, as far as that goes. The only hookups I saw were for the camp hosts, which aren't available anytime of the year for the general public. This also includes dumping stations for gray water or waste water, so be prepared to dispose of these some other way.
Bathrooms/Showers:
There were a total of six bathrooms and two showers in the whole campground that were spread out. The upper loop (sites 1-36) had one shower/bathroom combination building and one bathroom building with no showers.
The lower loop, consisting of sites 37-76 had two restroom only buildings and one shared shower/bathroom building. The bathroom buildings are spread out a little bit, which makes walking to the bathroom more convenient and less of a trek for most of the campsites.
I attached an image of the shower and restroom building that was in the lower loop close to camp site 51, so you can get an idea of what they look like inside.

Shower Tokens: If you want to take a shower you will have to go to the kiosk at the front of the park and exchange your money for shower tokens, which is the only type of currency that he showers accept. You will get approximately five minutes of hot water for every dollar you put in + $1 is equivalent to one token or five minutes of hot water.
Shower Notes: On a side note, the showers do take a little bit of time to heat up, so you will lose anywhere from 1 to 3 minutes of your valuable shower time waiting for the water to warm up. It wasn't that big of a deal, I just thought I would throw that out there.
I think it's also fair to mention that the water pressure was pretty decent and the water coming out of the shower was actually really hot and I had to turn it down a little bit, even though it was 39 degrees outside.
The shower stalls were divided up into two different areas, one area was strictly for the shower head, where the water came out and this room is separated by a divider and the other room had a bench where you could put your clothes, soap and other toiletry items, without getting them wet.
What Luxuries Are In The Bathrooms: The bathrooms were pretty basic, but when you go in there you will see many mirrors, flushable toilets and there were even power outlets where you can plug in a hair dryer or a shaver of some sort, if you needed to.
A good tip for using the shower rooms at the campground would be to bring a terry cloth robe and an extra pair of flip-flops specifically for showering.
The bathrooms are very cold and having a robe to put on right after would eliminate the amount of time that you are cold after you get out of the shower.
The extra flip-flops will come in handy, so you can keep all of your other shoes dry and prevent dirt and mud from sticking to the bottom of your shoes.
Vehicles:
The $35 a night covers your camping fees and one vehicle, so long as your vehicle fits on the paved portion of your campsite.
You are not allowed to park anywhere else, per the CA state park vehicle code.
If you do have an extra vehicle, you will have to pay an additional $8, and you will have to park it in the overflow parking lot, which is located quite far from the second loop (sites 37-76).
You are not allowed to park in other campsites, even if they are not being occupied.

Dogs:
Dogs are allowed everywhere in the park except in the pool complex area. There are three additional rules that are enforced as well and these really boil down to: your dog must be on a leash at all times, your leash cannot be longer than 6 feet is the background this is what will be and you can never leave your dog unattended.
Keep in mind that these are just the rules of the park you will also have to pick up after your dog, which is not specifically stated on the website, but it is something that everybody should have the common decency to do anyways.
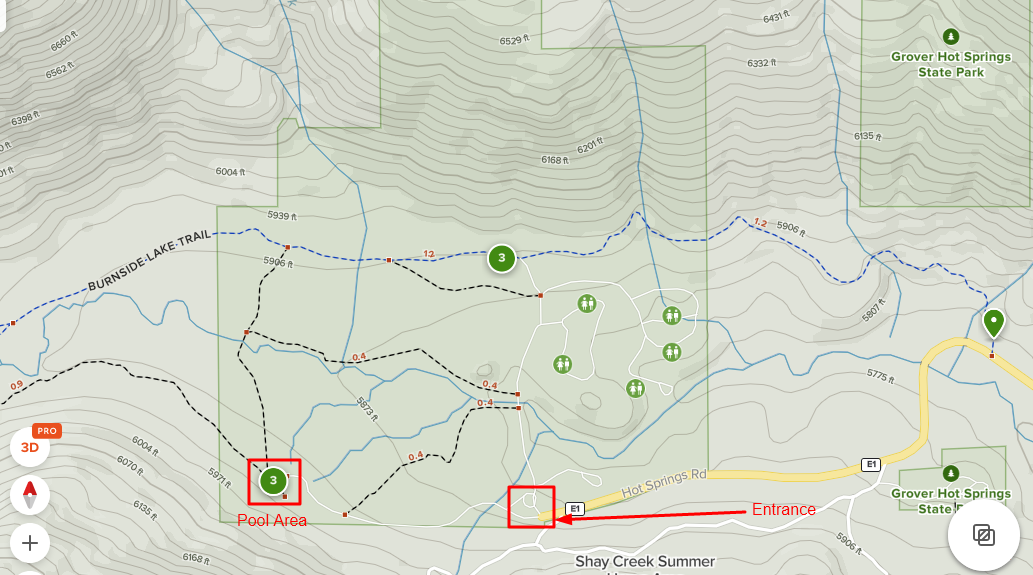
Day Use Area:
The day use area is located right after you enter the Gate of the park, on the right and is a large area that is not represented correctly on the map but actually consists of about a dozen or so very large spots with picnic tables, fire pits, water access, bear boxes and just about everything else that the campsites had.

There is also a bathroom located here. We have Verizon Wireless cell service and when we stayed here this was the only spot we got decent cell coverage and was able to access the internet. There is no Wi-fi around, no public Wi-Fi anyways that you can connect to.
The day use area is really great and has nearly all the amenities that the campground has and the creek actually runs right by it, so you can go down and check out the water while you're there.

Hot Springs:

Image courtesy of visitgroverhotsprings.org
The hot springs itself is definitely the main attraction when it comes to this state park and (for a small fee), you are allowed up to one and a half hours inside the hot pool, up to a maximum of two times per day.
The Hot Springs area is actually a more modern pool type of environment, with poured concrete and set up like an in-ground pool would be, complete with handrails, seating around the edges, etc.
Reservations: In order to enjoy the hot springs, you will have to make a reservation online via ReserveCalifornia.com. On the homepage of the website, look towards the top of the page and click on "Activities". Fill out all of the required information, make a payment and you will get an email confirmation with your reserved time slot and day.
If you do not have reservations, you could always go down to the kiosk (park entrance) and see if they have any availabilities for that day or another day you would like to go. Sometimes people cancel their reservations which means there would be an opening at the last minute that you could possibly fill.
The Pools: There are two different pools in the Hot Springs area, one hot, mineral pool and the other pool is a cooler swimming pool that you can jump in if you get too hot. There are changing rooms and a bathroom located in the pool facilities, along with storage cubes to hold your towels, shoes and whatever else you brought.
A Few Pictures From Grover Hot Springs:

Nearby Supplies:
Camp Kiosk: The kiosk at the campground only sells firewood bundles ($8) and bags of ice ($4), so you will have to venture outside the park in order to get any other supplies you need.
Markleeville: If you travel to the small town of Markleeville, roughly four miles away, you will find gasoline from the only gas station in town, a handful of restaurants and a general store.
Remember, the gas will be priced much higher than you would normally find, from our experience it was about a dollar twenty higher per gallon than what we found in Gardnerville.
Gardnerville: For all of your other supplies like getting your propane tanks filled or other camping gear, nearby Gardnerville is probably your best bet, as they have many stores to choose from like Walmart, Home Depot, Lowe's and just about everything else in between.
Gardnerville was only a 28-minute drive from the Park, and it was actually a beautiful drive, with the road running along the Eastern side of the Sierra Nevada mountain range.
Making Reservations:
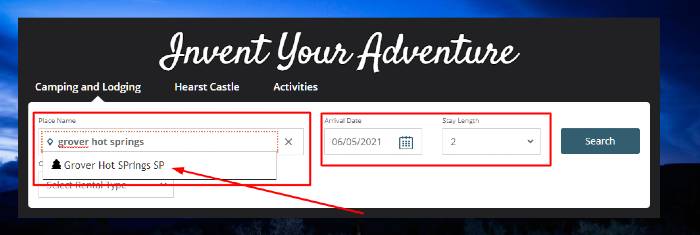
If you want to make reservations for the Grover Hot Springs State Park campground, then you will have to go online to reservecalifornia.com, in order to make your reservations. It can be a bit confusing using the online website to make the reservations, especially if you never have used the website before, so I wanted to make a short tutorial on how to go about doing it.
Step 1: The first step is to fill out the information on the website and this includes the place name, your arrival date and how many days you plan on staying. The image below chose Grover Hot Springs as the destination and I have the arrival date and how many days we want to stay also chosen.

One thing I do want to mention is that when you are inserting the Park's name, you will want to select the suggested drop-down name (red arrow) instead of just typing it out because for some reason, if you just type out the name, select your date and how many days you're staying and search it will not acknowledge your request.
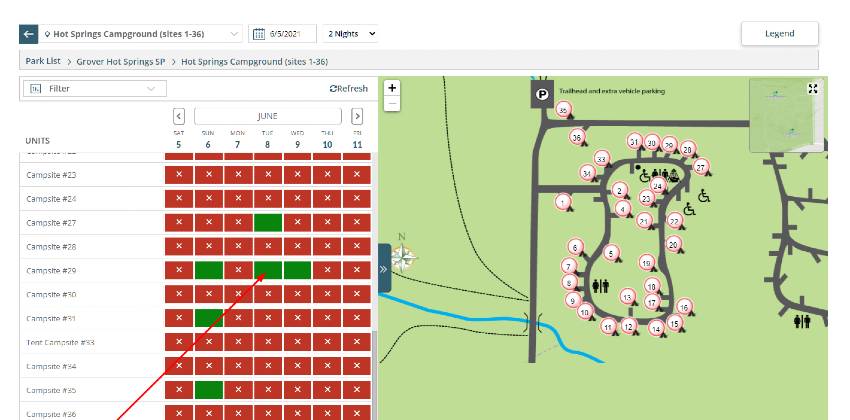
Step 2: After you enter all the required information for Grover Hot Springs State Park, you will get to a page that looks like the image below. Grover Hot Springs Campground is actually broken up into two sections on Reserve California's website; one section for campsites 1-36 and the other section is for campsites 37-76, which I outlined in the red box.
Just to the right of that you can see that it is further divided into "campsites" and "tent campsites". The "campsites" are for RVs and Tents and the "tent campsites" are only for tent camping.
And even further to the right of that section you will see four red boxes that have the words "check availability" inside them and this is where you want to click in order to see what sites are available and what days are available for those specific sites.

Step 3: When you click the check availability button on the previous step, you will come to a screen that looks like the image below. On the left side, the sites with the dates and their availability is shown and on the right is a map of the actual Campground where the campsites are located.
Pointing our attention back to the left-hand column, we can see that there are a lot of red boxes with white x's in the middle of them and these are not available but we also see some green boxes that the red arrow is pointing to and these sites are available on these specific days. All you need to do is click on the green box to reserve your campsite for that day or days.

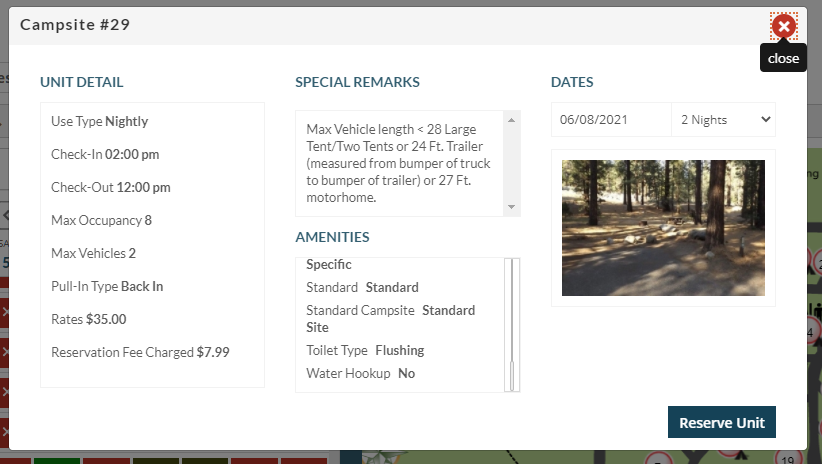
Step 4:
After you click on the green box, like I explained in the previous step, you will then be shown a pop-up box to confirm your reservation and in the lower right-hand corner of this pop-up box you will see a small button with "reserve unit" inside it. Click on that box to confirm your reservation.
Trails:
There are a ton of trails in Grover Springs State Park and surrounding the park itself and is probably the main attraction, next to the hot springs for most people. Everyone from beginner hikers to even hardcore hikers in fine something here, especially when you take into account the different seasons and weather.
Trails Inside The Park:
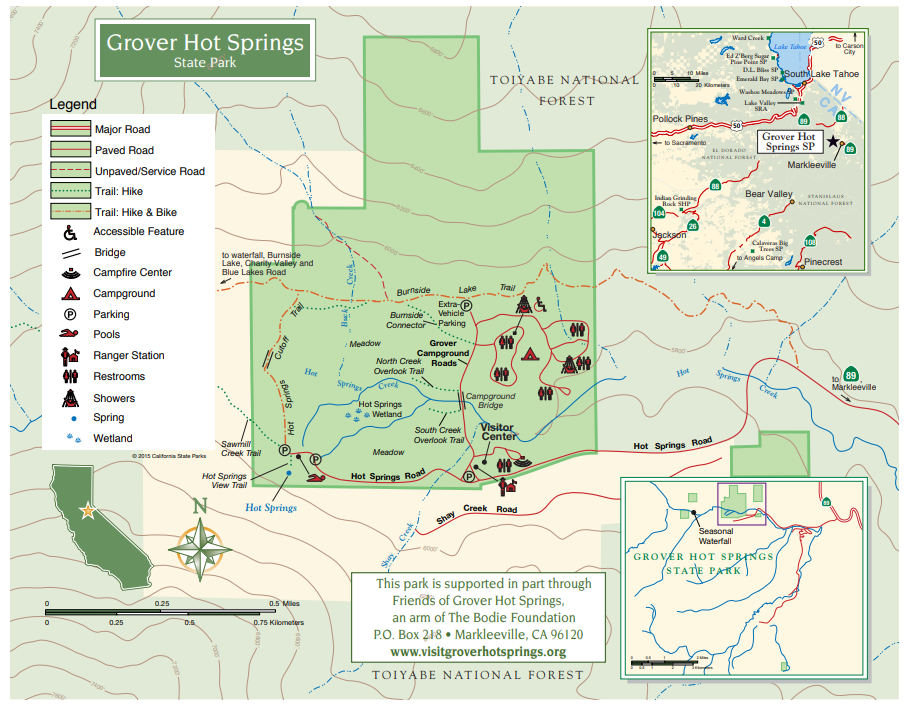
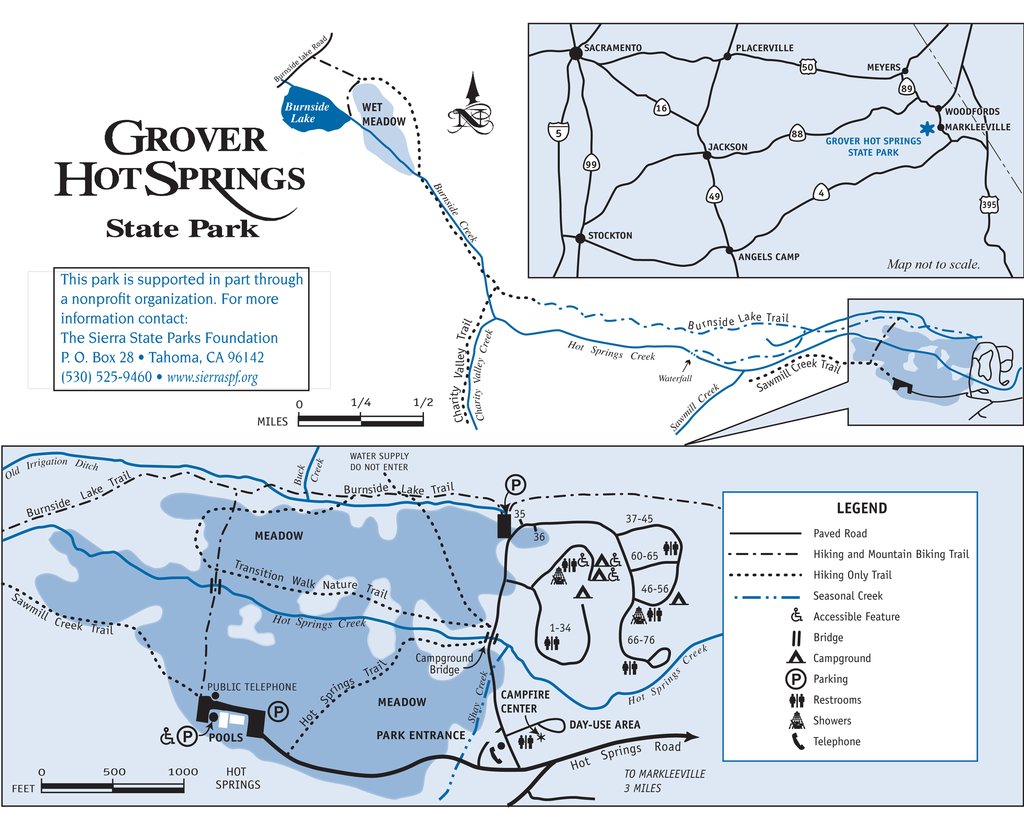
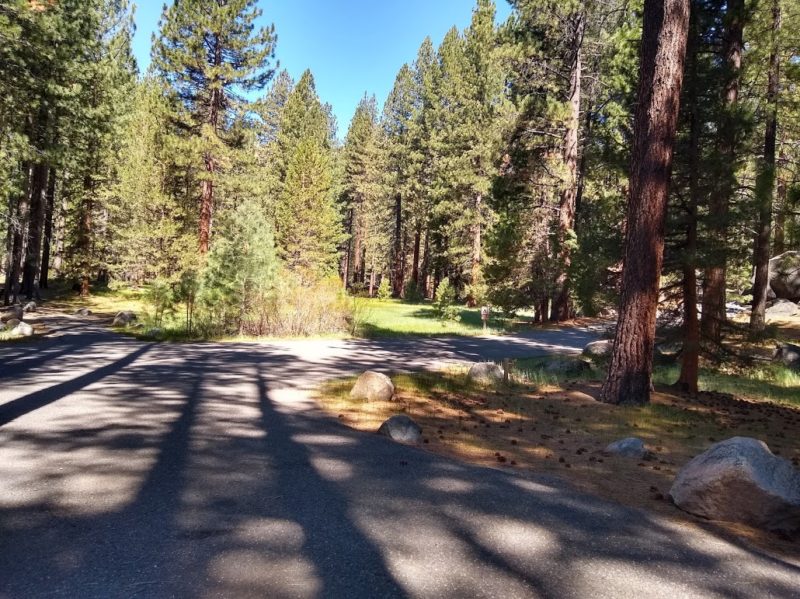
Most people that visit Grover Hot Springs State Park will probably end up using the trails within the park itself, rather than venturing outside the park, due to the convenience and proximity to the campsite. There are a couple of really cool trails that you can walk, ranging in length and there is even a newer ADA approved trail.
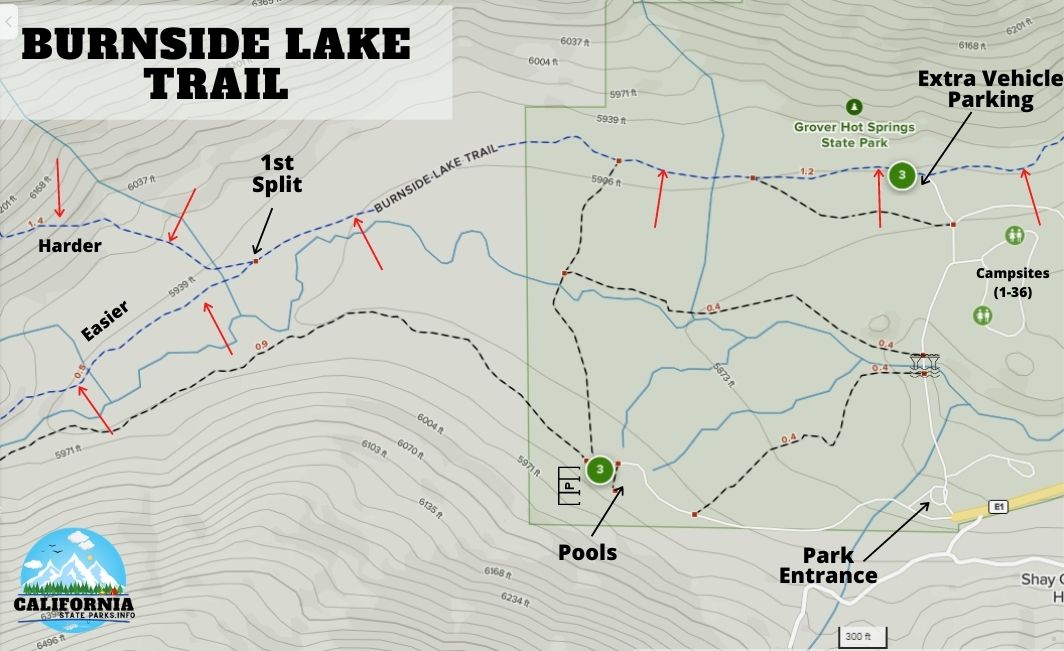
Burnside Lake Trail:
The Burnside Lake Trail starts in the extra vehicle parking lot area of the campground and is fairly level and wide at the beginning, for the first couple of miles and then gets pretty steep and narrow after that.
This trail does split off, so look at a map ahead of time to get a general idea of where to go. On a side note, If you take the northern route then this Trail is a harder one for most people, so be prepared for that.
The first split heads southwest and is a shorter, easier hike, while the second split takes you northwest and towards the third split where you can continue further north or split off to the Charity Valley Trail, which heads southwest.
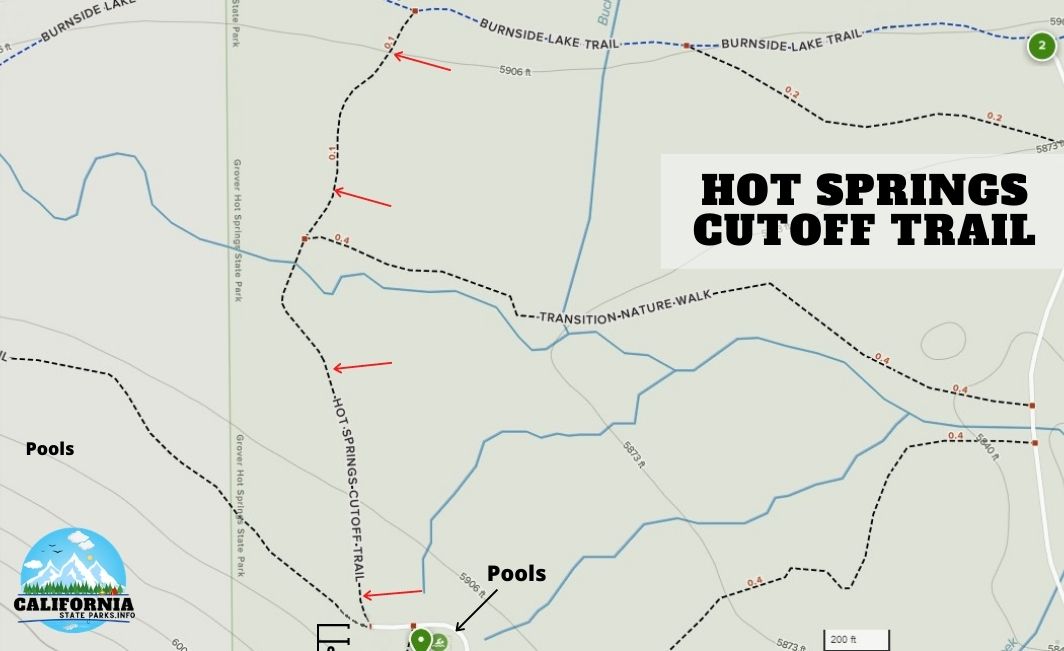
If you start in the back parking lot by the pool area, take the hot springs cut-off Trail and then head West on the Burnside Lake Trail, you can expect roughly an eight-mile hike to Burnside Lake. If you start from the extra vehicle parking lot inside the park, add about a mile to that, making it more like a 9-mile hike.

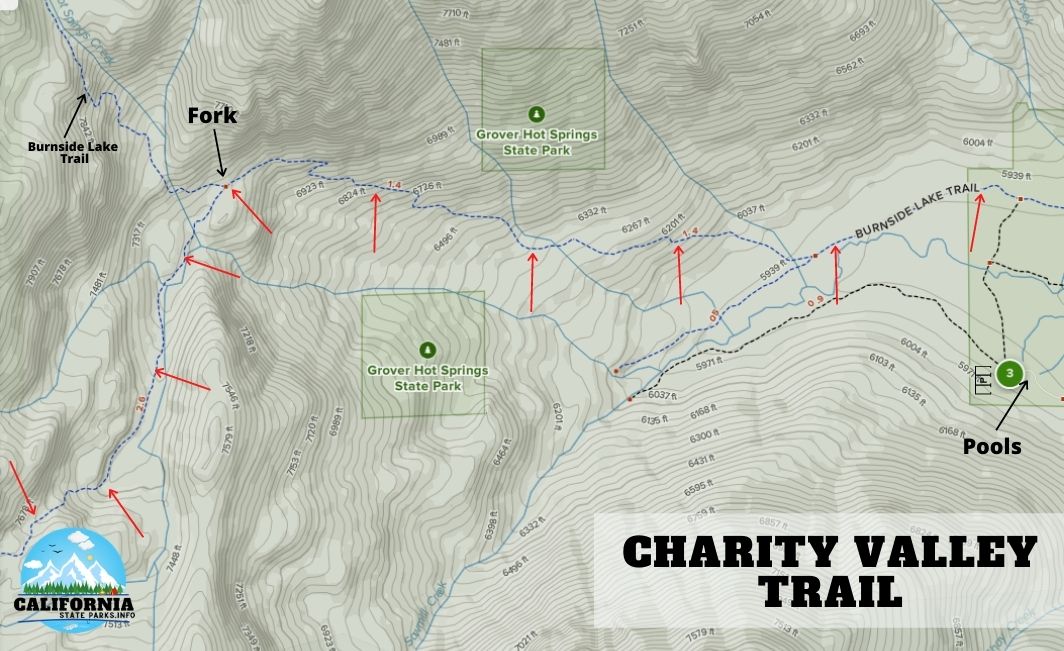
Charity Valley Trail:
The Charity Valley Trail can be accessed inside the park via the extra vehicle parking lot and your starting point would be on the Burnside Lake Trail that eventually turns into the charity Valley Trail, or you can take the Hot Springs Cut-Off Trail and head West from there on the Burnside Lake Trail.
If you look at the map below you can see that the Charity Valley Trail actually splits off from the Burnside Lake Trail and heads South. The map is only a small portion of the trail, as it goes all the way to Blue Lakes Road.
A lot of people like to start at Blue Lakes Road and make their way over to Grover Springs, as it is a little easier of a hike than starting at Grover Springs and making your way to Blue Lakes Road.
If you start your journey in Grover Springs State Park, then the trail is approximately 7 miles to Charity Valley.

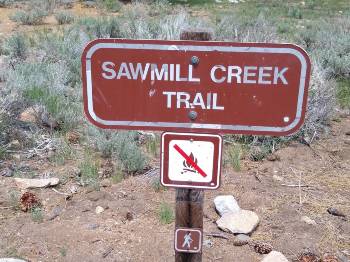
Sawmill Creek Trail:
The Sawmill Creek Trail starts at the back parking lot behind the hot springs pool area and shoots off to the left.
The trail is marked at the beginning and is approximately 1.9 miles (one way). The trail is narrower and moderately challenging, dogs are allowed.


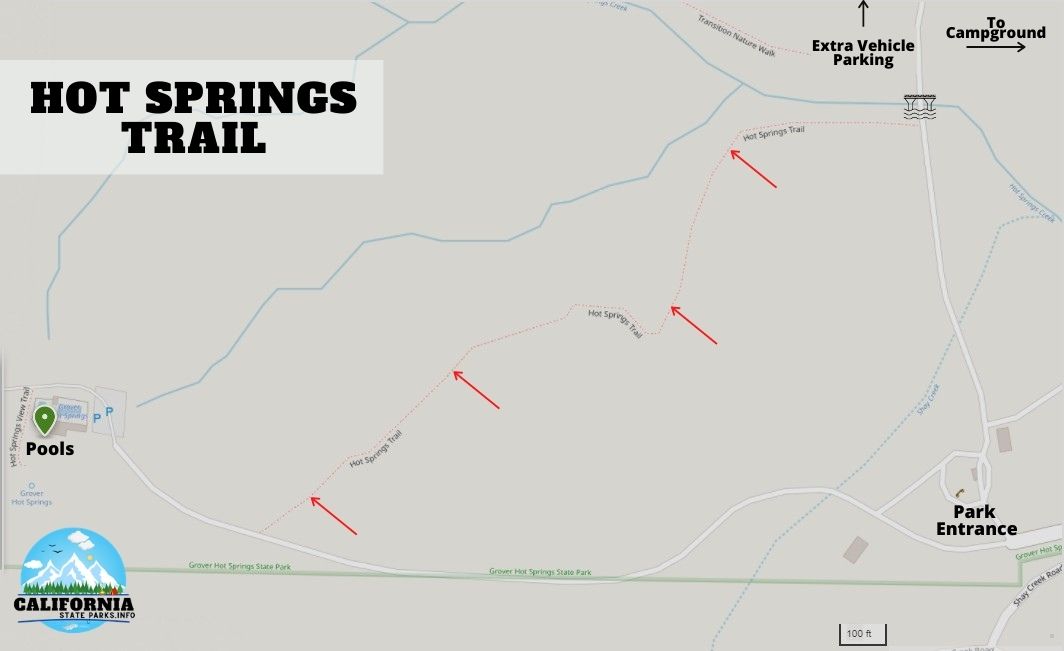
Hot Springs Trail:
The Hot Springs Trail is just a shorter trail that bypasses the road and has access points at the concrete vehicle bridge (between the main entrance gate and the extra vehicle parking lot) and the road that leads to the hot spring pool area.
It is a nice, short trail that makes walking to the hot spring pool area quicker and is a nice alternative to walking on the paved roads in the park.

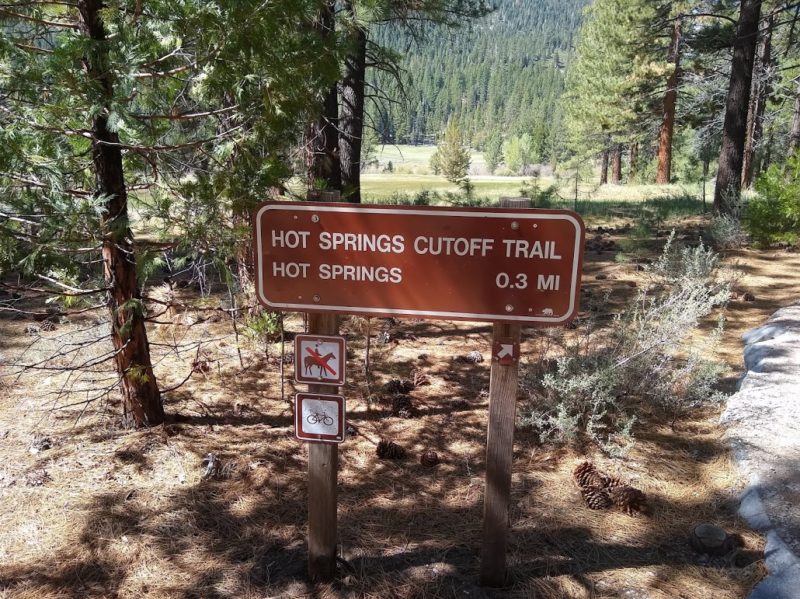
Hot Springs Cutoff Trail:
The Hot Springs Cut-off Trail is really just a shorter .3 mile long trail that connects the back parking lot of the Hot Springs pool area to the Burnside Lake Trail.
This is an ADA approved Trail which is wide and relatively flat, made of compacted gravel and it connects to the extra vehicle parking lot of the campground, if you turn right at the "T" (.3 miles in).


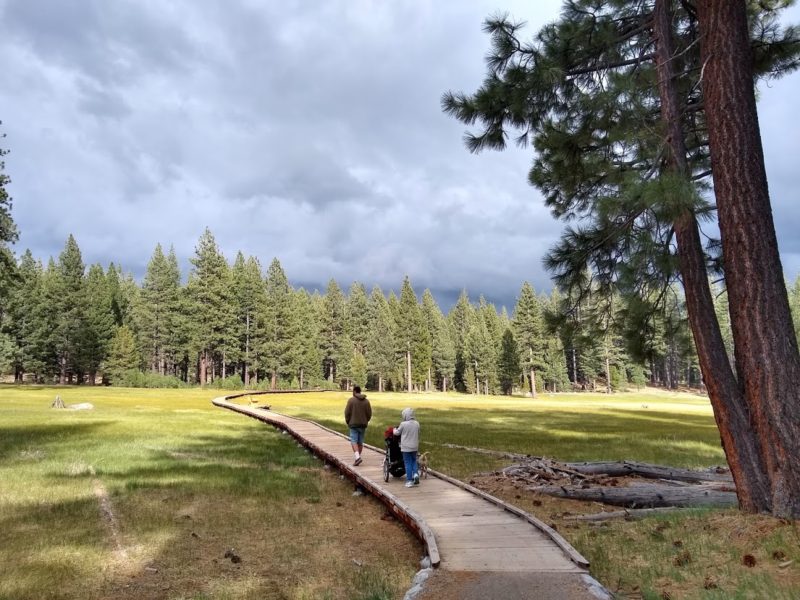
Grover's Falls Hike: The Grover Falls hike is a really nice hike for families and is even stroller-friendly if you have a jogging stroller with larger air filled tires. Typically you would start out in the extra vehicle parking lot and head West, down the Burnside Lake Trail.
From there you would go about a mile before the trail splits off, and you'll want to stay left, heading more south and avoiding the much longer and steeper Northern Burnside Lake Trail.
If you start at the extra vehicle parking lot inside the state park, you can expect roughly a 1.5 mile walk one way, for a total of about three miles round trip on a fairly easy, flat and wide path.

Trails Outside The Park:
Coming Soon!
Cabins:
I noticed that a lot of people were looking for cabin rentals in Grover Springs State Park and after doing a bit of research, I could not find any cabin rentals inside the park itself.
I was able to find rentals outside the area and if you really wanted to, you could pay the day use fee, book a reservation for the hot springs and go that route, so you could do the cabin rental and still experience the hot springs.
Fishing, Kayaking & Boating:
Coming Soon!
Helpful Resources:
This section will include all the helpful resources that I found along the way about Grover Hot Springs State Park and I wanted to pass these resources along to you because I'm sure they will be helpful to some people out there.